
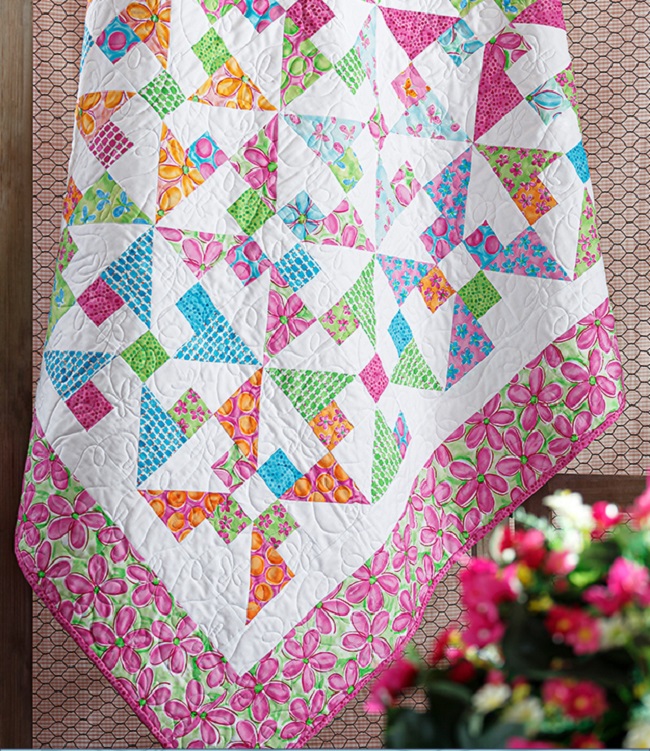
The Pinwheel Frolic Quilt free tutorial by Jenny Doan is a fantastic project for quilters looking to combine classic movement with modern efficiency. This design utilizes 5-inch squares (charm packs) to create a vibrant, energetic layout that works beautifully for baby quilts, lap throws, or even full-sized bed covers. By following this guide, you can master the art of the pinwheel without the stress of complicated measurements or wasted fabric.
This project is especially popular because it pairs a structured geometric design with the whimsical nature of precut fabrics. For the original version, bright and cheery Whimsy Daisical Charm Packs were used, proving that high-contrast prints can make the pinwheel “pop” against a solid background. Whether you are a seasoned pro or a novice, this project offers a quick and satisfying sewing experience that results in a professional-grade finish.
Creating Your Own Pinwheel Frolic Quilt free Design
The construction of this quilt relies on the clever use of half-square triangles (HSTs), which are the fundamental building blocks of many traditional patterns. By sewing two 5-inch squares together and cutting them on the diagonal, you create the units needed for the pinwheel blades.
One of the most exciting aspects of this tutorial is the bonus “burrito pillowcase” project included at the end. This technique allows you to create a professional pillowcase with a hidden seam, a decorative cuff, and a flange, making it a perfect companion piece for your new quilt. It is a great way to use up any leftover fabric from your charm packs and ensure your bedding set is perfectly coordinated.
Essential Materials for the Project
To get started on your Pinwheel Frolic Quilt free project, you will need a few basic supplies that most quilters already have in their stash. The use of precuts significantly reduces cutting time, allowing you to jump straight into the sewing process.
- Charm Packs: Two packs of 5-inch precut squares in your favorite prints.
- Background Fabric: Approximately 2 to 2.5 yards of a contrasting solid fabric.
- Border Fabric: 1 yard for the outer border to frame the pinwheels.
- Binding: 1/2 yard of fabric cut into 2.5-inch strips.
- Backing: 4 yards of coordinating fabric.
Our Experience Testing This Pattern
In our studio tests of the Pinwheel Frolic Quilt free design, we focused heavily on the precision of the half-square triangles. While the tutorial is very beginner-friendly, we discovered that maintaining a strict scant 1/4″ seam allowance is the “secret sauce” for this quilt. If your seams are even slightly too wide, your pinwheel points may get cut off when you join the blocks together.
Our team also experimented with different pressing techniques. We found that pressing the seams open for the center of the pinwheel significantly reduced the bulk where the four points meet. This made the quilting process much smoother, especially when using a domestic sewing machine. If you are struggling with “spinning” the intersections, take a moment to trim your HST units to exactly 4.5 inches before assembly—it makes a world of difference!
Where to Buy Fabrics:
Looking for the perfect charm packs for this project? Check out these trusted retailers:
Expert Tips for Success:
- Always starch your fabric before cutting; it prevents the bias edges of the HSTs from stretching.
- Use a magnetic seam guide to ensure every stitch is consistent.
- Layout your blocks on a design wall before sewing rows to ensure your colors are evenly distributed.
Step-by-Step Assembly Overview
The assembly of the Pinwheel Frolic Quilt free pattern is logical and repetitive, which makes it a great “chain-piecing” candidate. You will start by pairing a printed square with a background square, drawing a diagonal line, and sewing 1/4 inch on both sides of that line. Once cut and pressed, these units form the four blades of your pinwheel.
After you have completed your blocks, you will arrange them in rows. The beauty of this pattern lies in the secondary patterns that emerge when the blocks meet. For more inspiration on similar techniques, you can explore the comprehensive sitemap for more scrappy quilt tutorials and block guides.
Frequently Asked Questions
Is this pattern suitable for absolute beginners?
Yes! The Pinwheel Frolic Quilt free tutorial is perfect for beginners because it uses precut 5-inch squares, which eliminates a lot of the difficult cutting. If you can sew a straight line and follow the half-square triangle method, you can make this quilt.
What is the finished size of this quilt?
The finished size typically measures approximately 68″ x 76″ when following the standard layout, but it can easily be adjusted by adding or removing blocks.
Can I use fat quarters instead of charm packs?
Absolutely. You can cut your fat quarters into 5-inch squares. This is a great way to use up your fabric stash while still achieving the same scrappy look.
About the Designer: Jenny Doan
Jenny Doan is the face of Missouri Star Quilt Company and has taught millions of people how to quilt through her easy-to-follow YouTube tutorials. Known for her “keep it simple” philosophy, she focuses on using precut fabrics to make quilting accessible, fun, and fast for everyone.
Join Our Facebook Community:
Share your finished Pinwheel Frolic Quilt projects and get advice from fellow quilters:
Taking on a Pinwheel Frolic Quilt free project is a rewarding way to sharpen your piecing skills while creating something beautiful and functional. Whether you’re making it for a loved one or to brighten up your own home, the cheerful movement of the pinwheels is sure to bring a smile to anyone’s face. Happy quilting!